Part 1. Let’s write a simple sine wave generator with C++ and JUCE
In this small tutorial, I will introduce how to create a basic audio app and generate sine waves by formula. Firstly, I want to say a few words about JUCE. JUCE is the C++ library to develop cross-platform, interactive audio applications with graphics. JUCE supports Windows, Mac OS, Linux, iOS and Android. Also, it gives you the possibility to use predefined or custom UI. You can quickly build VST, VST3, AU, RTAS, and AAX formats and host VST and AU plugins inside your applications. JUCE provides full MIDI support, a new Multidimensional Polyphonic Expression protocol, and Open Sound Control (OSC).
Installation and project creation steps
- Step 1. Download Visual Studio if you are on Windows (which version you want). I use Visual Studio 2015.
- Step 2. Download the JUCE library from here. Extract all files into your working folder.
- Step 3. Create a simple audio app.
- Step 4. Open your project in Visual Studio, write code, and build :)
Let’s create a project with Projucer
JUCE gives us a great tool called Projucer. It can create project templates with basic code, configure your build solutions, and manage your project configurations. Open the Projucer and click New Project. You should see a window as below.

Quick description of what an Audio Application is. Full descriptions for all project types are listed here.
“Audio Application — This creates a blank JUCE application, like a GUI Application, but automatically adds all the setup code that you need to easily get audio input and output. You can use this for games, multimedia applications, and much more.”
We need an Audio Application project. Just write the name of your app, select appropriate target platforms, and click the Create… button.

After this window, you should see the project window. You can add or remove modules, change your solution configuration, and more. For now, leave it as is. To open your newly created project in Visual Studio, press Open in IDE… button.

Now, you can build a project and run it. You should see an empty window that does nothing because we didn’t add any custom code.
Let’s add custom code to generate a simple sine wave
We have a project template that successfully builds and runs on your machine. We want to add some code to generate a simple sine wave.
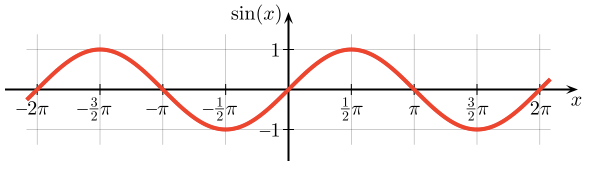
We start with a simple sine wave formula:

What parameters can be customized?
- Amplitude (A)— we can use it as a volume
- Frequency (f)— how many cycles per second it does
- Phase (phi)— starting point of sine wave
- Time (t)— just a time counter value (in our case)
Okay, we have a formula and need to translate it into the C++ code. Firstly, we should create private variables in the file MainComponent.cpp. Delta time is the smallest value added to a time variable, like a time step.

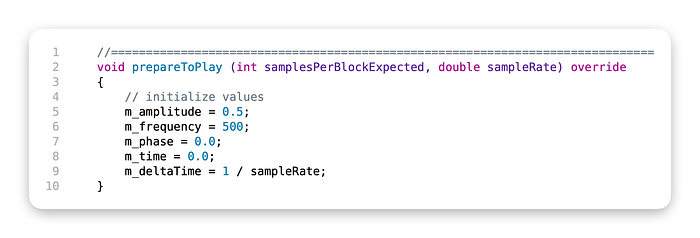
The next step is to initialize them in prepareToPlay(). This function is called once before the audio stream starts to be processed. Here, we set default values for our member variables. Yes, we can do this in the constructor, but it is less critical currently. Sample rate stands for samples per second. For example, the most commonly used is 44100 Hz. In our case, we need to know how much time has passed from one sample to another. This time is constant and remains stable but depends on the sample rate. If our sample rate is 44100 Hz, we should take 44100 samples per second. If we divide 1 over 44100, we get delta time between samples. This is the delta time value.

The next part will be the most interesting for us. What’s going on in that code below? Firstly, we need to get how many output channels we have and iterate over them (standard is to 2 channels, stereo signal). Also, it should be noted that we need somehow to modify our output buffer with sine wave data, so we get a pointer to that buffer by calling getWritePointer() for each channel. Buffer can have variable length. It can be modified by user or system preferences. In the last loop, we increase our time variable by delta time and use the sine wave formula to generate values assigned to the buffer. Note that the time variable is limited by its max value to prevent overflows. Now, you can run this application and hear a sine wave at 500Hz frequency.

Adding basic GUI to control parameters
Include Slider and Label classes in the MainComponent.cpp file and create class members in a private section. After that, we need to initialize these GUI elements in the class constructor. And by the way, fix the window more minor. Please note that we should also derive our class from Slider::Listener to handle slider changes and TextButton::Listener to handle mute button clicks. All slider changes by the user will be called sliderValueChanged(). When the user clicks a mute button — the buttonClicked() method is called. Also, we should write code in the resized() method to update widget positions. The volume slider uses a logarithmic scale. New parts with GUI code are listed below. Note that this code should be intelligently merged to your existing one, not replaced.

Change volume slider from linear to logarithmic scale (dB)
Decibel is a logarithmic unit that expresses the ratio of two values of a physical quantity, often power or intensity. In acoustics, it measures sound level or, more popular — sound volume. Here, you can find a comparison chart for different sound levels. In computer music, values should not go above 0.0 because of clipping, so we’ll have a different range:
- -96 dB — Mute
- 0 dB — Max Volume
- > 0 dB — Additional amplification (can produce clipping)
To convert between linear and logarithmic scales, use these formulas:


Firstly, I changed the range for the volume slider in the class constructor. Also, please consider how I modified the sliderValueChanged() method to convert the volume slider value from the logarithmic scale to linear.
Removing artifacts when changing frequency
If you change the frequency, you can hear audible artifacts and glitches that need removal. Rapidly changing s create them. Therefore, we need to smooth frequency change. I won’t be implementing this feature now. The main idea is to smoothly interpolate between the current and target frequencies for some time.
That’s all, folks
And that’s all, just run the app and listen to your sine wave :)

The source code is stored on GitHub.